Appetizer
06-12-2026
I went on vacation with friends. One week in, we had generated more than 1,500 photos across eight camera devices, including iPhones, Pixel phones, and proper DSLR cameras, shooting in JPG and HEIF, plus some WhatsApp photos usually saved as .png. After the vacation, we bundled more than 20 GB of photos in a Google Drive folder: a complete mess by filename, file type, date, and of course content. I wondered: what is the best way to sort out this mess and get to the photos that matter to me most as quickly as possible?
While I was pondering the question ‘which photos actually matter most?’, I received a call from my grandmother: ‘Grandson, how was your vacation?’ I realized that the photos that mattered to me, my family, and my friends would of course be photos of me doing things. So the goal was simple: without explicitly reviewing all the images, I wanted to extract the photos that showed me and send them to my family and friends.
This work shows how to calibrate a face recognition tool with 10-15 photos that can be obtained from any modern photo library. Next, it shows how a scoring algorithm writes quality information to a .csv file in a one-time scoring step. Since this step is expensive, we run it only once. A visualization script provides visual insight into the quality of the scoring step. With that insight, we then export the photos above the desired score threshold.
For readers who are familiar with Tikhonov regularization and regression analysis: we will rediscover a curve whose shape resembles the L-curve that is used as a parameter choice technique for the Tikhonov method. Sounds exciting, doesn’t it? Let’s jump in.
Table of contents
Introduction
Modern vacations are no longer documented by one person carrying one camera. They are documented by everyone, all the time, across phones, action cameras, compact cameras and the occasional questionable screenshot. That is great while traveling and rather annoying once the photos need to be sorted.
Manually solving the task scales badly. For 50 photos, manual review is fine. For more than 1,500 photos, manual review turns into data cleaning, and data cleaning is where automation should carry the first load.
The goal of the project is therefore practical rather than academic: build a local script pipeline that identifies likely positives, separates obvious negatives, and leaves only the ambiguous middle for optional human review.
This is not quite the same as finding all faces. A photo with five people is useful only if one of those faces is the target person. A landscape photo is not useful at all. A blurry side profile may still be useful, while a sharp photo of another person is not. Therefore, the problem is not object detection alone, but identity matching under imperfect data.
The work targets a practical human-governed workflow:
- generate a reusable and interchangeable identity file that contains the person of interest
- score all photos once, recording the success of the algorithm, the number of faces detected, and the confidence score
- generate a graphical representation of the scores
- use that visualization to let the operator decide which score threshold to use when extracting photos
The full code is available in my GitHub repository Facesorter. By storing the identity.npz file, Facesorter becomes a reusable tool. Running two scripts for each person of interest makes it possible to export photos from large group trips, old family-photo hard drives, and business trips alike.
Model
The model uses InsightFace through the FaceAnalysis interface and the buffalo_l model. The scripts run locally and in parallel, support common image formats such as .jpg, .jpeg, .heic, .heif, and .hif, and apply EXIF orientation before face detection. This matters in practice because phone photos often store rotation as metadata rather than as already-rotated pixels. The scripts use the package pillow-heif to preprocess modern compressed image formats.
The workflow follows the simple steps:
- load calibration data and raw photos from the repository
- calibrate via
calibrate.py - score via
score.py - visualize via
visualization.py - export via
export_threshold.py.
Calibration
calibrate.py builds the reference identity. I placed 10-20 photos of the target person into a calibration/ folder. The photos should cover front views, side views, different lighting and small appearance changes such as cap or no cap, beard or no beard. Sunglasses are not helpful, unless sunglasses are also expected in the target image set.
The selected face is converted into a normalized embedding vector \(I\) and stored in out/identity_person.npz together with a small calibration report. The script keeps the set of reference embeddings instead of collapsing them into one average vector. This preserves some variation from the calibration photos, which is useful when the target person appears from different angles.
Face embedding and similarity
A face embedding is a numerical representation of a face. In this workflow, InsightFace maps each detected face to a normalized vector. Similar faces should point in a similar direction in vector space. This turns identity matching into a vector comparison problem.
For two nonzero vectors, cosine similarity compares the direction of the vectors rather than their absolute length. Starting from the dot product identity,
\[\mathbf{a} \cdot \mathbf{b} = \lVert \mathbf{a} \rVert \lVert \mathbf{b} \rVert \cos(\theta),\]the cosine of the angle \(\theta\) between both vector directions is obtained by dividing by the vector lengths:
\[\cos(\theta) = \frac{\mathbf{a} \cdot \mathbf{b}} {\lVert \mathbf{a} \rVert \lVert \mathbf{b} \rVert}.\]Let \(\mathbf{I}\) be the identity vector from calibration and let \(\mathbf{f_c}\) be a face vector candidate from a photo \(P\). The candidate’s score \(S_c\) on \(P\) is obtained via cosine similarity:
\[S_c(\mathbf{I}, \mathbf{f_c}) := \cos(\theta) = \frac{\mathbf{I} \cdot \mathbf{f_c}}{\lVert \mathbf{I} \rVert \lVert \mathbf{f_c} \rVert}\]Both embeddings are already normalized.
\[S_c(\mathbf{I}, \mathbf{f_c}) = \mathbf{I} \cdot \mathbf{f_c} = \sum_{k=1}^{d} I_k f_{c,k}.\]If \(\theta = 0^\circ\), both vectors point in the same direction, \(\cos(0^\circ) = 1\), the dot product is \(1\), and the candidate is a perfect match. That is exactly the scoring quality returned by
score.py.
Scoring
score.py iterates through all photos in the data/ folder. For each image, it detects all faces and calculates the similarity between every detected face and the stored calibration identity. The score of a photo is the best match found in that image:
where \(P_j\) is photo \(j\) and \(f_c \in P_j\) ranges over the detected face embeddings in that photo. If no face is detected, the script assigns a score of \(-1\). This convention is convenient because photos without detected faces collect at the bottom of the sorted score curve. The output is a scores.csv file with the image path, score, number of detected faces, status, and a possible error message.
Threshold export
export_threshold.py does not run face recognition again. It reads scores.csv, selects all photos above a threshold, and copies them into an output folder while preserving the original folder structure. It can also export a score window, for example all photos with scores between 0.00 and 0.50. This is useful when separating high-confidence positives from a second folder that requires human review.
Results and discussion
Figure 1 shows the resulting score distribution in decreasing order. The abscissa represents the photo rank \(j\) in the dataset \(J\). The ordinate represents the identity score \(S_{P,j}\) found in each photo.
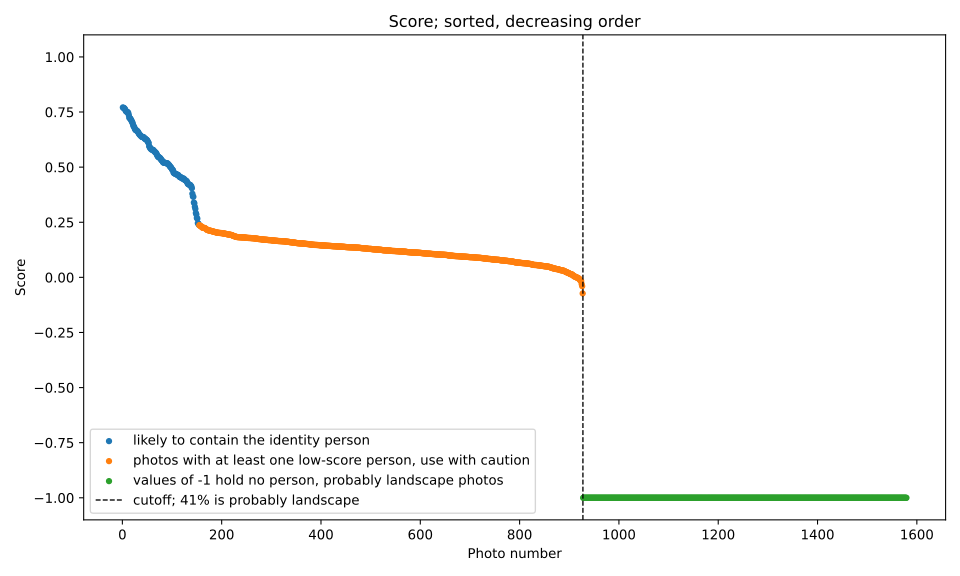
The first region (blue) contains high-confidence photos that are likely to show the target person. The middle region (orange) is defined as values \(\leq125\%\) the mean of all \(S_{P,j}\) that are nonzero. The last region (green) holds photos without people at all, indicating landscape photos. The vertical cutoff in the plot indicates that approximately 41% of the image set consists of landscape photos, suggesting that almost half of the review burden can be removed without making an identity decision at all. This leads to a practical review heuristic: First, export landscapes alone by using a maximum threshold of 0.0. Second, export high-quality photos for direct use. Third, separate the uncertain middle section (orange color) for human review. I used the simple \(\leq125\%\) heuristic to color-code the figure. Taking a closer look, we observe a clear bend in the score curve right at the color change. We can identify this region visually, but we can also describe it with signed curvature:
Signed curvature
After sorting, write the score sequence as
\[s_1 \geq s_2 \geq \dots \geq s_N .\]The rank \(j\) is the discrete curve parameter of the plotted L-curve, with points
\[(x_j,y_j)=(j,s_j), \qquad j = 1,\dots,N .\]The tangent angle of segment \(j\) is then estimated from the finite difference between neighboring plotted points:
\[\varphi_j = \arctan\left( \frac{y_{j+1}-y_j}{x_{j+1}-x_j} \right), \qquad j=1,\dots,N-1.\]With segment length \(\Delta \ell_j = \sqrt{(x_{j+1}-x_j)^2 + (y_{j+1}-y_j)^2},\)
the local signed curvature at an interior rank is approximated by the change in tangent angle per unit arc length:
\[\kappa_j \approx \frac{\varphi_j-\varphi_{j-1}}{\tfrac12(\Delta \ell_j+\Delta \ell_{j-1})}, \qquad j=2,\dots,N-1.\]The transition point is selected at the rank of maximum curvature:
\[j^\star = \arg \max_{2\leq j \leq N-1} \kappa_j .\]The cutoff is the corresponding sorted score at that ranked image:
\(\tau^\star = s_{j^\star}.\) This should coincide with the color change from blue to orange.
Thus, the sorted image index identifies the critical transition rank, while the actual export threshold is recovered from the score value associated with that rank.
Conclusion
Facesorter generates a reusable identity file. With that identity, all photos are scored once and scoring information is stored in a .csv file. A visualization reveals an L-curve shape that indicates the cutoff between photos containing people and pure landscapes. It also shows which photos are error-prone and need manual review. Lastly, we showed a three-step workflow to gather the photos. Finally, my grandmother received a best-of folder with a selection of photos that were not hand-picked from my last vacation.
Further reading
My friend Lorenz took the face-sorting algorithm to the next level by removing the need to generate the identity first. Instead, he groups similar identities extracted directly from the photo stack. He also added a run.sh file for convenient execution, generating a folder for each recognized face in the photo stack. Check out Facesorter 2.0.